Manage your hosted website easily

Manage your hosted website easily

Currently I own a sub-domain on one of my friend’s paid hosted domain. My personal website could be found here. Through this blog post I want to show you how to manage your hosted website easily. First step is to establish a connection to your remote host using FTP. For that I recommend FileZilla which is a fast and reliable cross-platform FTP client with lots of useful features and an intuitive graphical user interface.

To install FileZilla in Ubuntu open your terminal and write the following command:
# apt-get install filezilla

To open it just write the following command in your terminal:
# filezilla

You can now “Lock to Launcher” FileZilla if you are using Unity shell interface. I recommend after you connect to your remote host using the required username and password to copy all the directories and files to a folder located on your PC for backup purposes and also for easy modifying. For editing my HTML, PHP, CSS, JavaScript files i usually use Sublime Text which is a sophisticated text editor for code, markup and prose. You’ll love the slick user interface, extraordinary features and amazing performance. To install it in Ubuntu you have in the first place to download it from their website.

Assuming that the downloaded file is located inside “Downloads” folder open your terminal and write the following commands:
# cd Downloads/
# tar xf Sublime\ Text\ 2.0.1.tar.bz2
# mv Sublime\ Text\ 2 /opt/
# ln -s /opt/Sublime\ Text\ 2/sublime_text /usr/bin/sublime
# sublime /usr/share/applications/defaults.list
In the new window go to Find -> Replace… -> gedit.desktop in the “Find What:” box and sublime.desktop in the “Replace With:” box -> Replace All -> File -> Save.

After closing the window you can start Sublime Text by opening your terminal and write the following command:
# sublime

In Windows in order to have access to these software you just need to download them from their website (FileZilla & Sublime Text) , double click and install them. They have the same functionality on both operating systems being cross-platform software. I hope that this blog post help someone to manage his hosted website easily.

Questions?
E-Mail : MariusNVaduva@GMail.Com

How to create a bootable Ubuntu USB Stick in Windows 7

How to create a bootable Ubuntu USB Stick in Windows 7

In my last blog post I’ve explain how to install Windows 7 from a bootable USB stick made in Ubuntu and now I will show you the other way around.

Requirements
– PC that is running Windows 7
– 4GB USB Stick
– Ubuntu ISO Image
– Internet connection

HowTo
1. Download an Ubuntu ISO image from here
2. Download LinuxLive USB Creator from their website and install it
3. Plug in your USB Stick and quick format it to FAT32
4. Open LiLi and do the following:
– On step 1 choose your USB stick from the list
– On step 2 choose ISO / IMG / ZIP and point at the downloaded Ubuntu ISO image
– On step 3 choose 0 MB persistence (we will use “Live mode only”)
– On step 4 check all the boxes
– On step 5 just click the lightning icon and press Ok
5. Wait for the process to finish (it will open a page from their website on your browser then it’s over), close LiLi and restart your PC in order to install Ubuntu from the USB stick

Questions?
E-Mail : MariusNVaduva@GMail.Com
How to create a bootable Windows 7 USB Stick in Ubuntu

How to create a bootable Windows 7 USB Stick in Ubuntu

Let’s say that you have a PC that is running Ubuntu and for a strange reason you want to replace your current operating system with Windows 7. Following the guide below will assure you a proper installation from an USB Stick.

Requirements
– PC that is running Ubuntu
– 8GB USB Stick
– Windows 7 ISO Image
– Internet connection

HowTo
1. Open the terminal and write the following commands:
# apt-get install gparted
# apt-get install p7zip-full
2. Plug in your USB stick and write the following command into the terminal:
# gparted
3. Select you USB stick from the top-right list like in the image below:
014. Right click on it -> Unmount
5. Right click on it again -> Format to -> ntfs
6. Right click on the newly pop-up section -> Apply All Operations -> Apply -> Close
7. Right click on your USB stick -> Manage Flags -> Check “boot” box -> Close
8. Unplug your USB Stick, close GParted and then plug in again your USB Stick
9. Download UNetbootin v494 from here
10. Right click on the newly downloaded file -> Properties -> Permissions -> Check “Allow executing file as program” box -> Close
11. Double click on the file and use your root password
12. Point at your Windows 7 ISO image in the “Diskimage” section and check the “Show All Drivers (Use with Care)” section
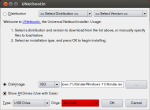
13. Select your USB stick from the “Drive” section like in the image below:
0214. Press Ok -> Wait for the loading bars to reach 100% (usually it remains stuck on one of them at 53% on the file INSTALL.WIM because of his 3248 MB big size) -> Reboot Now and Voilá you can now install Windows 7 on your PC using a bootable USB Stick made in Ubuntu

Questions?
E-Mail : MariusNVaduva@Gmail.Com